With warmer than usual weather for this time of year, it’ll be a great weekend for a ride to some awesome Portland events. Check out our list of events and bike rides in Portland this weekend:
Where: South Park Blocks Between SW College and SW Montgomery
When: 9am – 2pm, Every Saturday
The largest farmers market in Portland where you’ll find fresh produce, prepared food, lie music, & more!
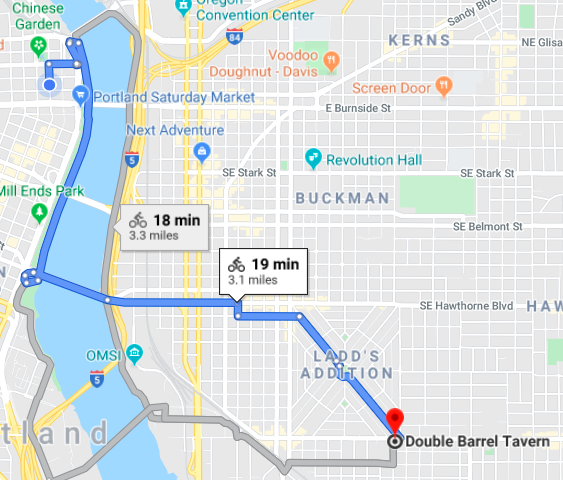
Ride through the Cultural district along the South Park Blocks. The Portland Art Museum, and the Oregon Historical Society are nearby, and definitely worth checking out. Ride down SW Harrison to the waterfront for a scenic route back.
Awesome party celebrating health and wellness! Come to enjoy a community of yoga, meditation, music, dancing, & art.
Cruise across the Steal Bridge towards the Moda Center, then turn left up the bicycle freeway known as Williams Ave. The event is also just a quick bike ride away from the lively Mississippi District, which is definitely worth checking out as well.
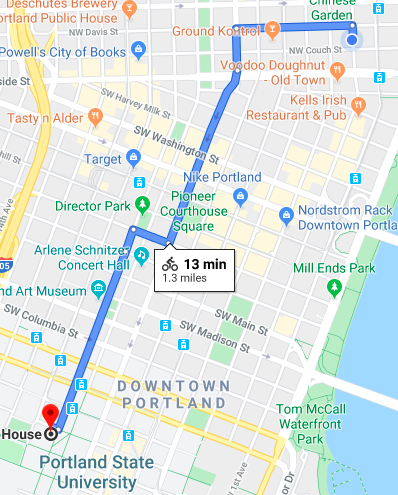
To get a seat at Century or International, you’ll have to show up at noon and endure the hours of pre-game yammering. Or, you could take the leisurely ride along Waterfront Park, across the Hawthorne Bridge, through Ladd’s Addition to the Seven Corners mainstay: Double Barrel Tavern.
The game will play on the huge projector screen, but you’ll still have elbow room to nibble the all-day happy-hour wings. (Try the Portland Sauce) If the bike staples are occupied, try the bike racks at the New Seasons across the street.
I am both an avid biker and backpacker but I never thought to combine the two into one experience until recently. This summer I came into possession of a fuji touring bike and decided to give bike packing a shot, and I thought I would write this post with some suggestions about bikepacking for beginners.
For my first trip I wanted to do a simple one night out and back trip, and after consulting an incredibly helpful Willamette Week article about bikeable campsites in the Portland area, I settled on taking a trip to the gorge and staying at Ainsworth state park. This was ideal as the park provided specific bike camping spaces with bike racks right next to the sites. while hilly, this route is both route scenic and do-able for the semi-experienced rider. I rarely felt unsafe even when on unprotected roads.
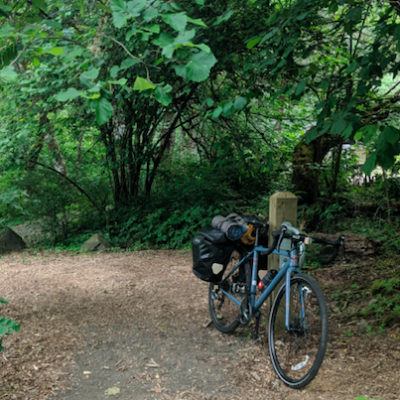
My Campsite at Ainsworth State Park’s bike packing area.
Preparing:
Food:
As someone who has been avidly backpacking for the last 10 years, the most crucial information I can pass along is that the bulk foods section at WinCo is your friend. For this trip I grabbed some of the bulk falafel mix. The falafel can be a bit dry, so I would recommend grabbing some hummus ( which you can get away with not refrigerating for a couple days if you keep it sealed), and pita bread.
For breakfast I went with the old standby of instant oatmeal with peanut butter; easy and quick but also great for a full day of biking. for lunch I would personally recommend something simple like apples and cliffbars.
Gear:
If you bike regularly in the city you probably have much of the needed gear already, such as panniers and bungie cords. However, I did have to go grab some gear from REI, Like a 2 L water bag (I used it to refill my small bike water bottle that I out in my down tube cage), and para-cord for hanging up my food bag.
For just a one or two night trip you can get away with a small gas canister for your stove, but if your traveling with more than one person it never hurts to go with something a bit larger. I also found that the REI half dome is great for camping as it comfortably fits 2 and is light weight enough for solo trips as well. For further gear info I would recommend checking out an article one of our staff wrote about packing for touring on our website.
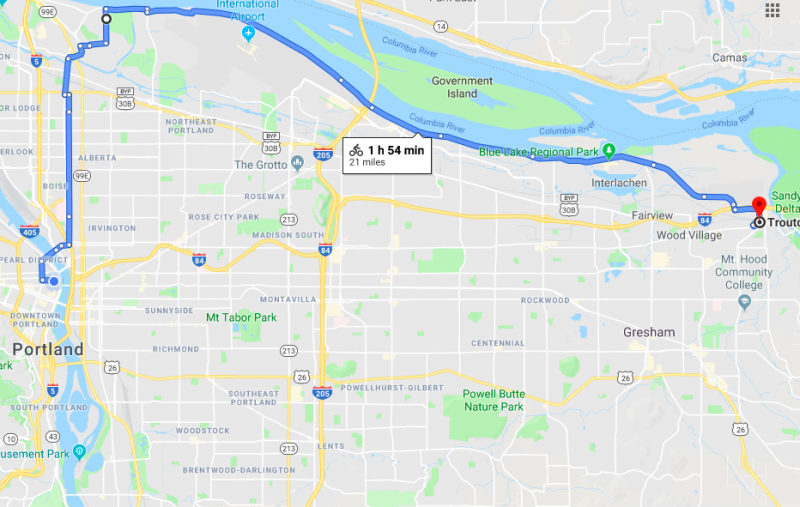
Getting There:
There are several ways to make your way to the town of Troutdale, the start of the historic gorge highway. Personally I recommend making your way down Marine drive as it is the flattest, most scenic, and most protected pathway there. However, East Burnside is also a very viable option.
My Route from Cycle Portland to Troutdale
The Ride:
To be perfectly honest the ride is not easy. There is about a 900 foot elevation gain to vista house, the halfway point, and no bike lane. With that said if you are in decent shape and bike regularly it is certainly doable, the drivers are pretty good about giving you space, and the shoulder of the road for the most part is close to bike lane sized. Also, the view from vista house and the subsequent downhill makes the climb well worth it.
Suggestions:
Personally I would recommend turning this into a multi day trip instead of a one night out and back. Starting in Warrendale the historic gorge highway turns into a walk and bike only path, that runs through most of the gorge. Next time I am planning on spending a night at Ainsworth, popping into hood river for a beer and an afternoon on the beach, then continuing on and camping in the Dalles.
Conclusion:
While just a short trip, I’d my trial bike packing run a success. I am looking forward to getting back out and I hope to see you on the road!
A recent visit from UK-based radio presenters on Gaydio.co.uk, Emma Goswell and John Ryan, had them raving about our Portland Essential tour which features some of the best of Portland’s car-free cycling infrastructure while explaining a bit about how Portland evolved into the city it is today. Top of their list of things to do when visiting Portland, their experience on out Essentials tour illustrated for them the ease of navigating Portland by bike, where they felt at ease on two wheels here in a way you just can’t get across the pond!
“It’s quite therapeutic when you aren’t filming on your phone with your other hand!”
Step 2: Actually Prepare for Winter. Suddenly Commuting isn’t so Hard!
Obvious in retrospect, but when I was in college I rode my carbon race bike (my only bike for a while) everywhere. There was no room for fenders in this SUPERFAST frame, so I would show up everywhere very wet. Now that I am older and (a bit) wiser, I realize that there is no gear more stylish than the crinkly clothes that go “swshswshswsh” because you can shed them like a wet snake skin when you arrive at your destination. The trick is you have to cover actually every part of yourself. I don’t know why it took me so long to realize, but this means jacket, pants, boots, gloves, and a hood or hat. If you want to commute like a professional, here are some recommendations from our staff with over 5 years of Portland commuting experience…
Lights
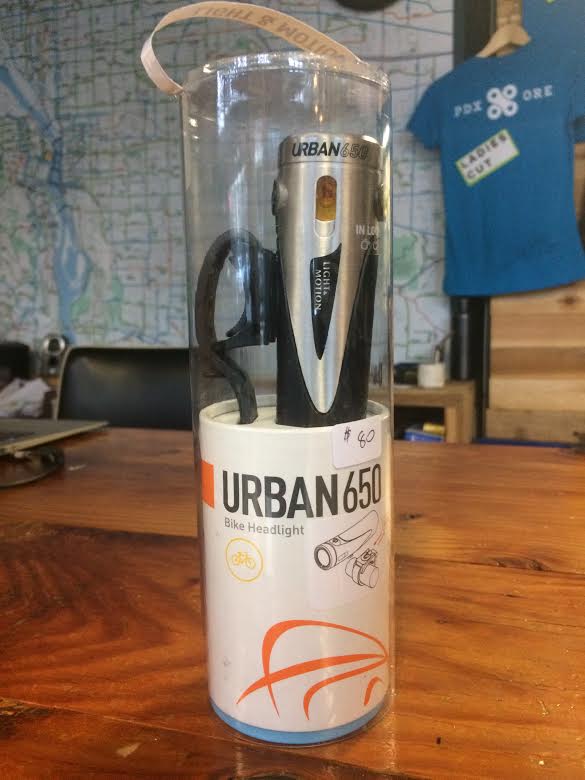
The #1 essential you should always shoot for is a spectacular pair of lights. Lights are good to have through all seasons, but especially so when the days are darker and shorter. I usually carry one high quality, USB rechargeable set, and one cheaper, disposable battery set as a back-up. The higher quality lights will be on my bike, with the back-up set in my bag. Be sure to remove lights from your bike when you lock it up, as these tend to be thief-bait. My favorite lights in general, and that we carry in the shop, are by Light & Motion.
Light & Motion Urban 650 Headlamp
Pictured above is the Urban 650 at $80. I’ve had this light since I started commuting 5 years ago and it still works fantastically. Cheaper lights I’ve bought have had a much shorter lifespan. We carry a variety of Light & Motion lights up to 800. The Urban 350 is fantastic for city riding, especially if your commute is already lit. If you’re like me, and have very dark commutes with no lamps, the 650 is a good go-to.
Raingear
The first thing you want to do before you ride is check the weather report. What’s today’s high/low? What are the chances of precipitation by the hour? I like to think of “percent chance” of rain as actually being “percent volume”. But most telling: How many centimeters or inches is it supposed to rain today?
That last question helps me really decide how much gear I need each day. For example, if it’s going to rain 0.3in or more in one day I will definitely grab my pair of rain pants and rain boots. Here’s how I personally categorize rainfall/day:
0.0in – 0.3in: A light drizzle, just a rain jacket will suffice (sometimes I’m stubborn and even go rain-jacket-less, but that’s just me. Like I said, I’ll always have it handy regardless).
0.3in – 1in: Depending on what hours percent-chance is highest, this could be a getting soaked situation. If it rains 1in in the course of one hour, that’s very heavy rainfall. If it rains 1in over the course of a whole day, that’s more of manageable-medium rainfall. These are the things I pay attention to so that I am prepared for my ride.
1in-4in+: This is more of a flash-flood situation, be prepared to be soaked.
Other Gear
Fenders are essential, unless you are a fan of mud stripes down your back. Depending on your commuting situation, you may also consider upgrading to all-weather brake pads, upgrading to wider tires with more grip, or covering your bike up if you park it outside to prevent excess wear. Come by the shop and we’ll be more than happy to help you get set up for year-round riding and turn that frowny commute upside-down. Plus, if you come in before December 31st, all our accessories are 25% off, so you’ll save on your lights, fenders and other gear!
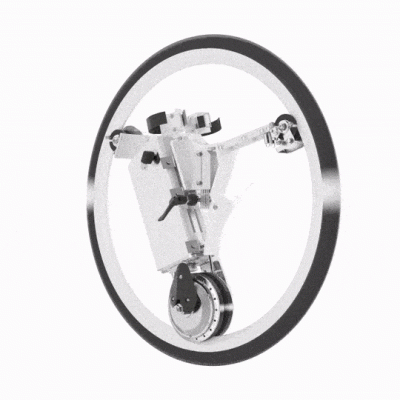
Tired of spokes, putting air in your tires, and having to pedal your bicycle in the first place? You’re in luck! GeoOrbital has introduced a radical alternative to a standard front wheel, with a fully contained electric motor. The GeoOrbital E-Bike drop-in wheel one of the quickest ways to set your bike up with electric power – all you have to do is put the wheel on and set up the throttle on your handlebars and you’re good to go!
The wheel has no spokes, instead the hub remains stationary while the rim rotates around it. This also means the wheel requires very little maintenance beyond regular charging. It never has to be trued, and with sealed bearings and motor components there’s little to no chance of water and grime working its way in. Plus, the tire is filled with foam rather than air, making it immune to flats.
GeoOrbital wheels haven’t made it onto our bikes yet, but we do have two models of electric assist bikes available. Stop by any day, or make a reservation on our website, and we can set you up to try one out! The e-bike revolution has to be ridden to be believed. Check the wheel out here.
Most cyclist have a special relationship with their steed- giving it a cute yet meaningful name, buying it little gifts like a cool new bell, etc… In essence, your bike is an extension of yourself (or at the very least, on the same level as a beloved pet). This is why bike theft is such a horrible, gut-wrenching experience for the unfortunate ones who suffer this egregious transgression… Unfortunately, the only 100% way to protect your baby is to never let it out of your sight, but that is hardly feasible given the size of most apartment bathrooms… There are things that you can do, however, to protect and deter and lessen your chances of becoming a statistic.
Locally sourced… from a volcano.
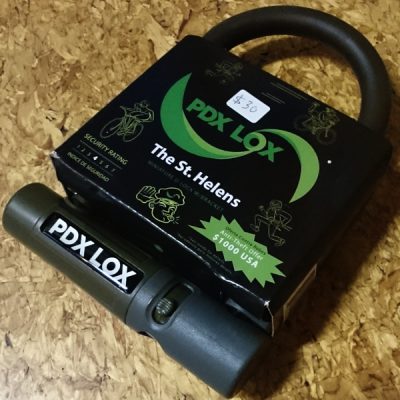
At Cycle Portland we stock all of the accessories you need to help you avoid bike theft. First and foremost, you need a high quality U-lock that is big enough for you to easily secure your frame, but not so big that a thief could use a tool to pry it open. We carry U-locks by Kryptonite and PDX Lox. Both are more that adequate to secure your steed! We are happy to help find the right size lock for your bike and walk through some best practices with you. On a side note, we DO NOT recommend using a cable lock for bike theft prevention; they are easily cut with the most basic bolt cutters.
HubLox skewers with their unique keying system
For your wheels, the component we see most commonly stolen, we highly recommend locking skewers to secure your “go-discs” to your frame. Pin-Head Anti-Theft Skewers are uniquely keyed and provide the best wheel protection. There are other locking skewers available that use either a specific key or a hex wrench to removed the wheel which also work well, but Pin-Head provides the greatest piece of mind.
You should secure other parts of your bike as well, depending on the value you place on them (both actual and sentimental). Basically, if it is not welded to your frame, a thief given enough time and opportunity will steal it. Locking headset caps, locking seatpost collars, and saddle leashes are also great tools to secure the littler bits.
Also (and perhaps most importantly), it’s always a good idea to register your bike’s serial number and info over at Bike Index so that bike shops like us can keep an eye out for your precious baby if fall victim to bike theft. They’ve helped recover well over 3,000 bikes through the program, and even if you just get your frame back… well, that is half the battle right there! (By the way, your serial number can usually be found stamped into the metal on the underside of your bottom-bracket and is usually comprised of eight or more letters and numbers)
A couple of other little things you can do help prevent bike theft are secure your bike in a well-lit, highly visible area with lots of foot-traffic. A thief needs time and privacy to break a high-quality lock, and by robbing them of those (pun intended) two elements will usually cause him or her to pass on to a bike in a more secluded location. Secondly, if you are parking your bike on a rack with other bikes, try to park in the middle rather than on the ends of the racks as a thief will go to a the bike most easily accessed. Lastly (and our favorite), personalize your ride! Stickers, reflective tapes or colored electrical tapes, nail polish… all little things you can use to permanently “individualize” your bike. A thief wants a plain, unadorned bike that they can quickly unload. A bike covered in stickers or googly-eyes or miniature statuettes of liberty won’t unload so fast on the “black market…”
Head over to our friends at Bike Portland for more suggestions and a more complete list of precautions to keep your baby safe from bike theft! If you have more questions, stop on by the shop today and ask one of our helpful employees for advice on which security options will work best for you and your bike. After all, it’s your baby and no one likes it when babies are stolen.
(We’d love to hear from you! Email us with some suggestions you might have for bike security or send us a picture of your individualized steed! (please put “My Awesome Steed” in the subject line) We love to see how people make their bikes their own and keep ’em safe!)
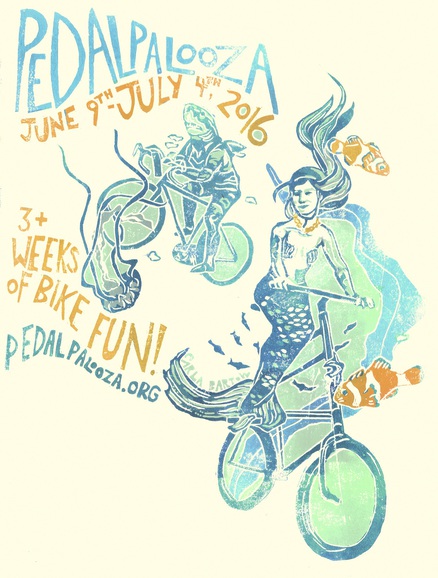
The 14th annual Pedalpalooza is in full-swing, with 250+ group rides already scheduled. This year, the fun will be going on until July 4th. You can find the 2016 schedule here on Shift2Bikes, and below are some highlighted rides. We all wish we could make it to every single one, but our legs (and schedules) can only take so much. Many of the popular rides below have pre-rides that meet up with them, so check the schedule and see how many you can fit into your month of June!
June 17th: Dropout Prom Ride, 9:30PM, Col. Summers Park
June 18th: Rooftop Ride, 10:30PM, Lillis-Albina Park
June 19th: Zoobomb, 8:30PM, SW 13th & Burnside
June 23rd: Thursday Night Ride, 7:30PM, Salmon Street Fountain
June 24th: Little Lebowski Urban Achiever Ride, 7PM, Col. Summers Park
June 24th: The Guthrie Ride, 10PM, NE 11th & Alberta
June 25th: The World Naked Bike Ride, 8PM, Location TBA
June 26th: Sunday Parkways, 11AM, Kenton Park
July 2nd: Loud & Lit, 9:30PM, Irving Park
July 4th: Independence Ride, 8PM, Woodlawn Park Amphitheater
Pedalpalooza 2016, June 9th-July 4th
Come out and join the fun, we hope to see you there!
Our bikes are vulnerable companions! Every part and piece is quick release, always ready to be liberated. We are forced to leave bikes out on the street all day (and occasionally, all night). So you ask, “How should I best prepare my bike to be left outside?” Well, we’ve got Mechanic Mike here to tell you his favorite approaches to theft-proof and secure his bike components and accessories when he doesn’t have the option to store it safely inside. He is going to tell you about his favorite products and tricks to keep your wheels, lights, computers and saddles from disappearing into the night.
We regularly hear from disappointed bike-owners down here in Downtown Portland–a city known for its risky bicycle environment. Wheels are the most expensive part that might wander away while your bike frame is properly locked to a bike rack. We will start with ways to make sure you’ll be able to roll home after work, after dinner or after your night out.
Hub Locks
Hub locks are a great option for securing your wheels around town. There are a few brands that we carry here at Cycle Portland depending on your budget and desired security.
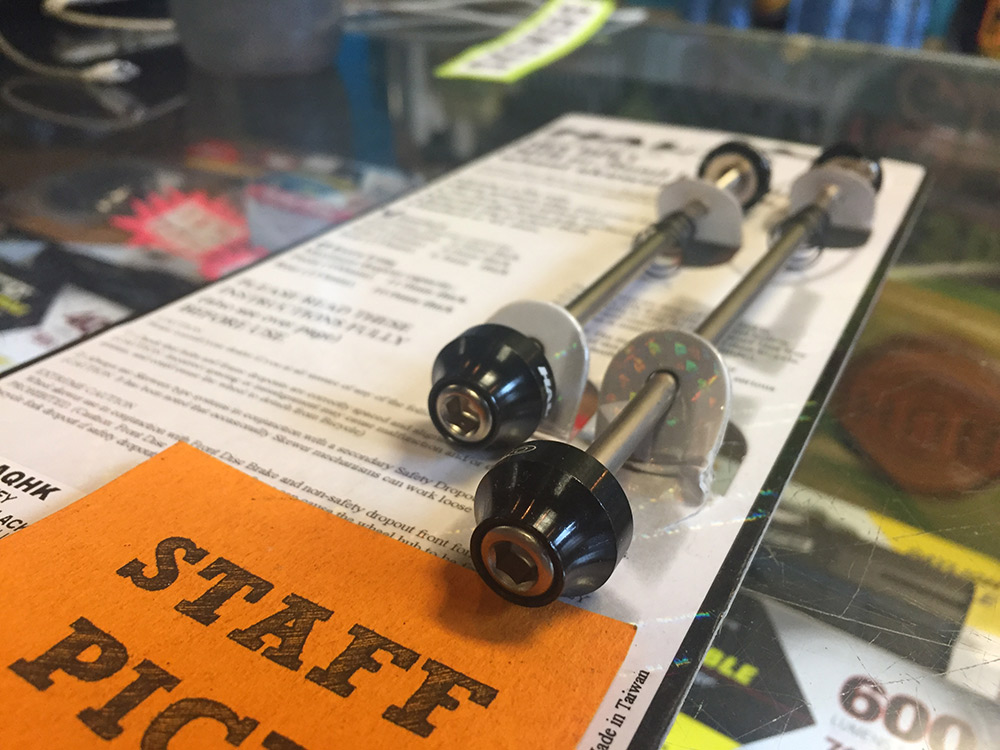
“Expensive but Secure”
The Pinhead Security Pack is an option with individualized keys for the highest level of protection. Like your house or Kryptonite key, this unique key offers the most security for your wheelset. A pair of Pinhead security skewers will cost you a bit more than $50, but give you the most confidence that someone isn’t working your wheels loose while you’re at work. So if you often lock up outside in theft prone areas or just want to protect those hand-built wheels, we would be happy to install these on your steed today.
“Economical Security”
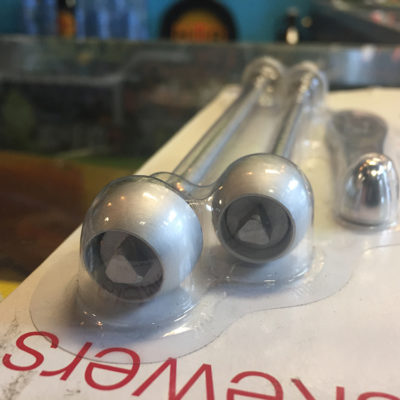
HubLox offers a pair of anti-theft skewers that utilize a specialized key shared with all other HubLox. This means that a thief would have to be carrying a specialized HubLox key to take your wheel (unlikely, but possible.) Much easier to get ahold of than your individual Pinhead key, but still offering a pretty good confidence that your bike is secure. No one is going to remove these skewers with an adjustable wrench. Just make sure your shop has a copy of the key for any repair that might require they remove the wheels.
(Here is the triangle key interface)
“No Special Key to Carry”
Halo Hex Bolt Skewers are Mike’s personal favorite for keeping our rental single speed bikes safe. These can be installed with a simple hex bolt meaning you don’t have to remember to take your hub lock key with you in case of a flat fix. This works best if you want a deterrent so that a thief can’t grab and go with your new wheels.
DIY Trick: this one will be useful for a number of different parts of your bike. Often, simply adding a hex wrench controlled skewer won’t keep your wheels from wandering off during the day. A DIY trick that Mike is particularly fond of is adding another obstacle to prevent easy removal of the wheel. Using a bit of glue to keep a ball bearing in a hex bolt opening prevents any tampering with your Halo Skewers, stem, seatpost clamp, etc. A cheap additional level of security that can be undone with a bit of heat or muscle.
Keeping your saddles on your bikes
A stolen bike seat can be a hassle and usually expensive to replace. Below are a couple of the many ways you can theft proof your saddle.
Cable: Planet Bike, ABUS, and OnGuard all produce a dedicated “seat leash”, a thin cable designed to be used with a separate lock to secure the rails of your bike seat to the frame. These leashes are relatively cheap (~$5-10) but must be paired with another lock to theft-proof your seat.
DIY Trick: Here is an idea: use an old chain inside a bike tube. If you have an old chain lying around (or want Mike to do it for you), this is a great use of it and a cheap, cut-resistant alternative to a seat leash.
Lights, Bells and Computers
Accessories are the most stolen equipment for most bicyclists. It is almost a right of passage for new commuters to lose a set or two of lights before they find a way to secure or remove their accessories. Hopefully you got a chance to read this before you lost your first set. Mike doesn’t like to remove his lights every stop so he has found a few DIY ways to keep his lights securely attached. Here are a couple ways to secure your accessories with the least amount of energy and money.
Take Them with you: The safest option is always to take your accessories with you whenever you leave your bike unattended. Make a habit of grabbing everything off your bike whenever you lock up and use the chance to charge your USB powered rechargeable lights and bike computer.
DIY Trick: Cut your tabs! One way to slow down a would-be thief is to cut the quick-release tabs off of your light mounts. With this trick, you can leave your lights on the bike for quick stops as it makes removing the lights a much slower process requiring a screwdriver or pocketknife.
 The Pinhead Security Pack is an option with individualized keys for the highest level of protection. Like your house or Kryptonite key, this unique key offers the most security for your wheelset. A pair of Pinhead security skewers will cost you a bit more than $50, but give you the most confidence that someone isn’t working your wheels loose while you’re at work. So if you often lock up outside in theft prone areas or just want to protect those hand-built wheels, we would be happy to install these on your steed today.