Top 4 Underrated Tools

For this week’s post, we are bringing you our Top 4 most underrated, and undervalued tools. These are the tools that you’ve always seen as overpriced or superfluous, but we explain their true benefit and why they pay off in the end. You may notice, we don’t recommend one brand for every tool. This is for two reasons: one, as a small business, we are not tied to any tool company or brand; and two, there really is no brand that wins out in durability, usability, and price for every tool they make. But you don’t have to believe us, come down and check out the different options yourself at Cycle Portland.

Picking Your Tire Lever

Pedro’s vs Park Tool

Tire Lever
Pedro’s Tire Lever

Quality makes a big difference, even for some of some of the smallest tools. Design and plastic composition in tire levers become apparent after changing even one or two and become amplified after a few hundred tire changes. The Pedro Lever slots in the groove much better with a wider and better designed profile. The stiffer cross section mean less flexing and breakage when taking off a stiff tire.


Choosing Your Multitool

Crank Bros vs budget 6 toolCrank Brothers Multi-tool

You’ll notice a couple things you’ll notice when you finally need to pull that multitool out of its deep, dark corner of your saddlebag. First, you’ll notice the length and design of the handle. Getting the leverage to really tighten down that offending nut often takes more than a one-inch handle. Second, you’ll notice the construction of the whole contraption when it starts to loosen up and fall apart. For whatever reason, the bolt fastening method of those cheap-o tools will rattle apart after about five uses. The Crank Brothers set is a lifetime tool. Spend the money and you won’t regret it.


Start Your Toolkit Right with a Proper Long-handle SetPark Tools Wrench Set

When picking a good set of hex tools to start your toolset, what are the important things to look at? Long handle for leverage and hard to reach places, connected with metal vs plastic, having a ball-style on one end. Between tightening crankarms, removing stuck pedals, and accessing hard to reach brake bolts, long handle hex wrenches are indispensable. Combine that long handle with a ball-style end and you’ll able to tighten any bolt on your bike stress-free.

Note: Know what to use the ball-style hex for and what not to! Its perfect for adjusting a tough-to-access brake calliper or bottle cage. Just don’t try to lossen a rusted bolt as your more likely to round out the bolt head.

Why You Can’t Do Without Cable Cutters

Why should you invest in a genuine cable cutter rather than using snips to cut your cable housing? Trust us, you will regret every minute of your experience trying to cut shifting cable with snips. Shift housing is made up of long metal wires that run the length of the tubing. Attempting to cut these with snips leads to terrible cuts, poked fingers and a lot of frustration. Take it from us, it’s a $20-$35 tool that is worth its weight in gold!prod-tools-pedros-cable-cutter-2-wr

5 Best Cost-Effective Upgrades for Your Bike

MIKE’S BIKE ADVICE

This week’s post will suggest the five most cost-effective upgrades to make your ride the most enjoyable experience of the day. Spending $300 to upgrade your crankset or to shave a couple dozen grams from your bike won’t make nearly the difference in enjoyment per dollar that changing your grips or finding a perfect saddle for your shape. Mechanic Mike is here to tell you his top five favorite upgrades for the money.


Upgrade your Grips or Bar Tape

IMG_2279Beautiful selection of Cinelli Gel grip tap in stock right now.

Not only will this give your bike a totally sweet new look, finding the right grips for your riding style will make you a much happy camper. Riding long days in the saddle without gloves and downhill mountain biking with gloves need two different types of grippy-ness. Sometimes leather grips are the right material for riding with minimal callouses and long life of your grips. Things to think about when choosing your grips: style of riding, weather conditions, gloves vs no gloves, or come in to Cycle Portland to ask for our recommended grips for your riding. It is a cost-effective upgrade to your bike ride. 

Find the Right Saddle for your Seat

IMG_2274We have this beautiful Cardiff in the window waiting for its forever home!

Not every saddle works for every person, but it makes sense to put energy into finding the right saddle for you. There are a couple saddles that have a wide appeal among cyclist, a couple leather saddles among these options. Stock saddles are chosen based on the cheapest price for the bike manufacturer and the look of the saddle. Neither of these considerations pay off for your sit bones. Come in for a saddle consultation and upgrade today.

Tires Rule Everything A-round MeIMG_2249

Great selection of Marathons on this wall.

Nothing ruins a ride like getting a flat tire, and nothing prevents flats like the appropriate tires. We love a pair of Marathon Plus’s for pretty much every riding application, but there are some riding that requires specific tires. Fine tuning the bike’s connection to the ground produces some of the most favorable improvements for your daily ride and costs less that $50 a tire.

Cockpit SwapHandlebars

Our selection of handlebars  in the shop.

Finding the best height for your handlebars and possibly even changing your handlebars could reduce the pressure you feel in your hands, wrists and shoulders. Mechanic Mike has even found that by switching handlebars, he has eliminated pain in his neck and back. Even raising your stem by an inch or changing your handlebar bend by 15 degrees, can change your approach to riding.

Basket Game

Cycle Portland single-speed wald basketWe love Wald Baskets at Cycle Portland!

Having a place to drop your bag, carry home groceries or even to put your sandals and shirt after a swim in the river makes your bike more functional, beautiful. There was a time when all bikes came with a basket or rack to provide a trunk of sorts for your bicycle. Trust Mike when he says you’ll find ways to fill up your basket nearly every ride.

We are here to help you have a great ride, daily from 9am – 6pm!

For all your cost effective bike upgrades visit us at 117 NW 2nd Ave, Portland OR

Theft-Proof Your Bike Parts

Mike’s Bike Advice

Our bikes are vulnerable companions! Every part and piece is quick release, always ready to be liberated. We are forced to leave bikes out on the street all day (and occasionally, all night). So you ask, “How should I best prepare my bike to be left outside?” Well, we’ve got Mechanic Mike here to tell you his favorite approaches to theft-proof  and secure his bike components and accessories when he doesn’t have the option to store it safely inside. He is going to tell you about his favorite products and tricks to keep your wheels, lights, computers and saddles from disappearing into the night.

We regularly hear from disappointed bike-owners down here in Downtown Portland–a city known for its risky bicycle environment. Wheels are the most expensive part that might wander away while your bike frame is properly locked to a bike rack. We will start with ways to make sure you’ll be able to roll home after work, after dinner or after your night out.

Hub Locks

Hub locks are a great option for securing your wheels around town. There are a few brands that we carry here at Cycle Portland depending on your budget and desired security. 

“Expensive but Secure”

Theft-Proof Pinhead Skewers
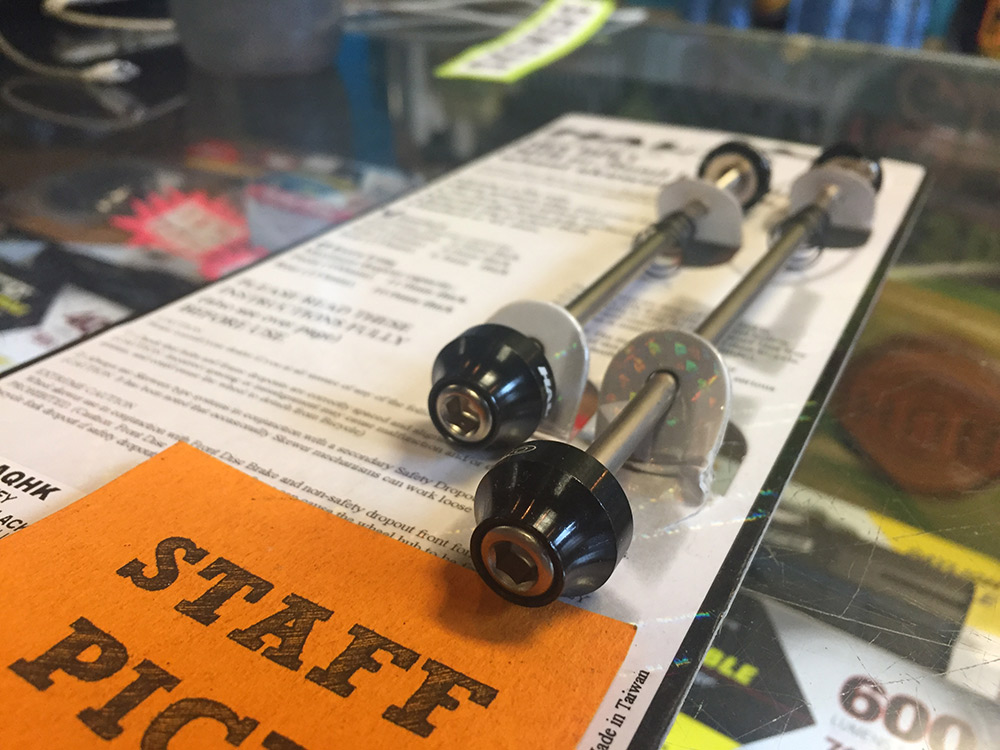
The Pinhead Security Pack is an option with individualized keys for the highest level of protection. Like your house or Kryptonite key, this unique key offers the most security for your wheelset. A pair of Pinhead security skewers will cost you a bit more than $50, but give you the most confidence that someone isn’t working your wheels loose while you’re at work. So if you often lock up outside in theft prone areas or just want to protect those hand-built wheels, we would be happy to install these on your steed today.

“Economical Security”

IMG_1575HubLox offers a pair of anti-theft skewers that utilize a specialized key shared with all other HubLox. This means that a thief would have to be carrying a specialized HubLox key to take your wheel (unlikely, but possible.) Much easier to get ahold of than your individual Pinhead key, but still offering a pretty good confidence that your bike is secure. No one is going to remove these skewers with an adjustable wrench. Just make sure your shop has a copy of the key for any repair that might require they remove the wheels. 

Hublox Triangle Skewer
 (Here is the triangle key interface)

“No Special Key to Carry”

Halo Anti-Theft Skewer

Halo Hex Bolt Skewers are Mike’s personal favorite for keeping our rental single speed bikes safe. These can be installed with a simple hex bolt meaning you don’t have to remember to take your hub lock key with you in case of a flat fix. This works best if you want a deterrent so that a thief can’t grab and go with your new wheels. 

DIY Trick: this one will be useful for a number of different parts of your bike. Often, simply adding a hex wrench controlled skewer won’t keep your wheels from wandering off during the day. A DIY trick that Mike is particularly fond of is adding another obstacle to prevent easy removal of the wheel. Using a bit of glue to keep a ball bearing in a hex bolt opening prevents any tampering with your Halo Skewers, stem, seatpost clamp, etc. A cheap additional level of security that can be undone with a bit of heat or muscle.

Keeping your saddles on your bikes

A stolen bike seat can be a hassle and usually expensive to replace. Below are a couple of the many ways you can theft proof your saddle. 

Cable: Planet Bike, ABUS, and OnGuard all produce a dedicated “seat leash”, a thin cable designed to be used with a separate lock to secure the rails of your bike seat to the frame. These leashes are relatively cheap (~$5-10) but must be paired with another lock to theft-proof your seat. 

DIY Trick:  Here is an idea: use an old chain inside a bike tube. If you have an old chain lying around (or want Mike to do it for you), this is a great use of it and a cheap, cut-resistant alternative to a seat leash.

Lights, Bells and Computers

Accessories are the most stolen equipment for most bicyclists. It is almost a right of passage for new commuters to lose a set or two of lights before they find a way to secure or remove their accessories. Hopefully you got a chance to read this before you lost your first set. Mike doesn’t like to remove his lights every stop so he has found a few DIY ways to keep his lights securely attached. Here are a couple ways to secure your accessories with the least amount of energy and money.

Take Them with you: The safest option is always to take your accessories with you whenever you leave your bike unattended. Make a habit of grabbing everything off your bike whenever you lock up and use the chance to charge your USB powered rechargeable lights and bike computer.

DIY Trick: Cut your tabs! One way to slow down a would-be thief is to cut the quick-release tabs off of your light mounts. With this trick, you can leave your lights on the bike for quick stops as it makes removing the lights a much slower process requiring a screwdriver or pocketknife.


What to Oil and Grease? Nearly Every Piece

Riding a bike takes a lot of blood, sweat and tears. It also requires a bit of oil and grease to keep your bike moving smoothly with all the blood, sweat and tears that you’re getting on it. Have you ever question what to oil and grease? Have you ever questioned the frequency at which you should be doing such? We’ve got your post-holiday, slightly out of shape, Mechanic Mike here to tell you what to oil, grease and what to keep nice and dry. If you’ve got any questions or have a suggestion of what to cover here, leave us a message or stop by the shop anytime!

What should I oil? What should I grease? 

tri-flow2Essentially, you want to make sure all moving parts are oiled and greased appropriately. Some parts are more exposed to dirt, water, movement and friction and require more regular oil.

Chain? Oil regularly, at least every month if you ride regularly. Just remember to clean off excess oil with a rag so it doesn’t attract dirt.

Cables/ housing? Oil new cables and housing and to loosen up stiff cables. 

U-Lock? Definitely put some oil in the key slot and a bit of grease on the lock mechanism if you live in a damp climate or leave the bike locked outside. 

Brakes Levers and assemblies? Can’t hurt to oil the calipers, especially older springs and contact points. Keep the oil away from the pads.

Derailleur levers and assemblies? A couple drips of oil around springs and joints keep your bike shifting silky smooth. 

Rack bolts? Definitely put some grease on the bolt threads to make removal easier. 

Fender bolts? Grease as above. 

Pedal Threads? Your mechanic will thank you in a few years if you grease the pedal threads when you install your new set of pedals.

PhilWoodWaterproofGrease1

Seat post? Grease! (at least with aluminum and steel, carbon is a different animal) Seat posts are notorious for getting corroded in place as water seeps down the upright tubes. 

Kickstand? Does it get wet? Is it metal? Does it move? Grease or oil. 

Springs? Oil away!

Threads? Grease away!

Bearings? Grease… More info on hub overhall is available online. 

Quill Stem? Grease… Threadless? Very light grease in some cases

Nipples? Oil 

What I should not oil? What should I keep oil away from?

Carbon – All carbon components have their own requirements for maintenance. 

Handlebars – Keep the clamping surface clean for handlebars that don’t slip. 

Anywhere near your braking surface (rims or disc brakes) – This one is super important. Keep your brakes operating well by keeping them oil free. Disc brakes can become corrupted if they absorb oil or grease. 

Tires – Just like the braking surface keep oil and grease away.

Cassettes – Keep your cassette as clean as possible to get the most life out of your drivetrain. 

17fx2rreajn3cjpg


And remember WD-40 is not “oil” or  and should generally never be used on your bike.

Cycle PDX Resumes Normal Hours

Fresh off the snow storm of 2015, Cycle PDX has been back open and rockin’ it on tours since Wednesday. The sun is out, and we still have a few spots left on our afternoon tour if you’ve been itching to get out.

Ride safe and see you soon!

Snow Day!

Due to our absolutely fantastic weather outside, we’ll be closed today 1/2/16 until roads are clear enough to resume tours. Stay safe, stay warm, and drink some hot cocoa for us! (We will post here again once we resume normal operation)

Happy New Year from Cycle PDX!

MIKE’S BIKE ADVICE  – Flat Tire Prevention

WHY DO I KEEP GETTING FLATS?

Over here at Cycle Portland, we fix a lot of flats! We have been hearing a good deal of confusion and frustration about frequent and repeat flat tires. Do you find yourself dealing with flat tires or slow leaks twice a month or more? Mike decided to give the issue a go for this edition of Mike’s Bike Advice to clarify why you are getting flat tires and how to prevent them in the future. If you have further questions, unusual issues or want to get a flat fixed for $13 (tube and labor), come on in to Cycle Portland and ask for Mike.

So without further ado, here are some reasons why you are getting flats:

TIRES ARE WORN, OLD, NEED REPLACING – Flats are one sign your tires no longer protect your tubes from the outside world. Regularly inspect your tires for wear (thinness, gouges, bald spots) in the tread, wear or cracking of sidewalls and sharp objects stuck in tires.


igotabike_DSCN9232bike-tireaging_cracks


PUNCTURE PATCHED WRONG OR SHARP OBJECT NOT REMOVED – If you like to patch your tubes make sure that you are properly placing, gluing and drying the patch. Also, make sure to inspect the corresponding spot on the tire once you find the hole in the tube. This will help you find what caused the puncture so you can remove the sharp object from the tire. Always inspect the inside of the tire and wash or wipe all debris out.

WRONG TIRES FOR TYPE OF RIDING – Some types of road/racing/cross tires are not suited to commuting through the city. The lightweight, “sticky” nature of speedy slick and cross tires means they are much worse at avoiding pieces of glass or metal. Come by Cycle Portland to hear our pick for best puncture protection and long wearing tires.

RIDING AT TOO LOW PRESSURE (PSI) – Riding at too low of a pressure can cause pinch flats in the tube in addition to potentially damaging your rim. Make sure to check your PSI before heading out the door to avoid rim strikes and snakebites in your tubes. Proper tire pressure for road bikes is generally in the 80 – 120 PSI range, Mountain bikes run at 30 – 65 PSI and city bikes are generally best at 50 – 80 PSI.

TUBE IS PINCHED FROM BEING IMPROPERLY INSTALLED – Do you find you get flats just after replacing a tube? The problem might be with your tools or technique for installing the tube and remounting the tire. When putting a new tube in, make sure the tube in completely inside the tire and that the tire is not pinching any of the tube before inflating.

RIM STRIP IS OFF OR IN BAD SHAPE – While changing your tube, take a good look at the strip of fabric tape that protects the tube from the spoke holes in your rim. If the strip is torn, pushed to the side or frayed, the pressure of riding the bike can wear or puncture your tube.

rim-tapeIMG_5716

VALVE STEM BROKEN – Both Schrader and Presta stems can break away from the tube if the stems are rocked back and forth trying to attach a pump or due to tube slip at low pressure. Presta valve cores also have a tendency to bend when attaching a pump.

WRONG SIZE TUBE – Make sure the size of your tube matches the size of your tire! Running a tube that is too big for your tire leads to folded tubes and friction. Running a tube that is to small creates space for the tube to shift, which can cause pinch flats and broken valve stems.

BRAKES RUBBING ON SIDEWALL – When adjusting rim brake pads always check that they will not be rubbing on sidewall. This creates a thin spot in the tire sidewall that can unexpectedly cause a blow out.

RIDING AT TOO HIGH PSI – Conversely, do not exceed the recommended PSI for your tires. This will cause your tubes to blowout.

AVOID DEBRIS – And always remember to avoid riding though debris, leaves and deep puddles. It’s always a good idea to avoid riding through anything where you don’t have visibility. Also, don’t ride near the curb as all the debris from the road collects there. Ride defensively and take the car lane or bike lane so you are not forced to ride in the road grit.

FIXING FLATS

Fixing flats is easy and quick once you get the hang of it. At the shop we have all the tools you need and spare tubes. A basic kit to always keep on your bike includes tire levers, spare tube or patch kit and hand pump. If you don’t have quick release skewers you can also carry an Alan Key set and/or a 15mm wrench.

At Cycle Portland you can get your flat fixed in a jiffy for just $13 boner dogs! No appointment ever required for service. Drop your bike off anytime; we are open 9am – 6pm everyday!

IMG_1536


P.S.

Here is what Sheldon Brown has to say about getting, preventing and fixing flats: http://www.sheldonbrown.com/flats.html

BOOK NOW